Quick Links
Players who hope to reach the end ofAnimal Wellmust find four Flames and use them to illuminate the Seahorse, Ghost Cat, Chameleon, and Ostrich statues. While the positions of those Flames are marked on the in-game map, reaching them can be difficult. Indeed, fans may get confused as they attempt to collect the P., B., V. and G. Flames inAnimal Well, and this guide is here to alleviate that confusion.
While it is possible to reach some of the Flames before all the game’s tools have been collected, it is recommended that players who are pursuing them have the Disc, Bubble Wand, Yo-Yo, and Slink in their possession. Additionally, fans are advised tounlock fast travel inAnimal Well, as that feature can make reaching Flames much easier.
Animal Well: How to Get B. Flame (Bottom-Left)
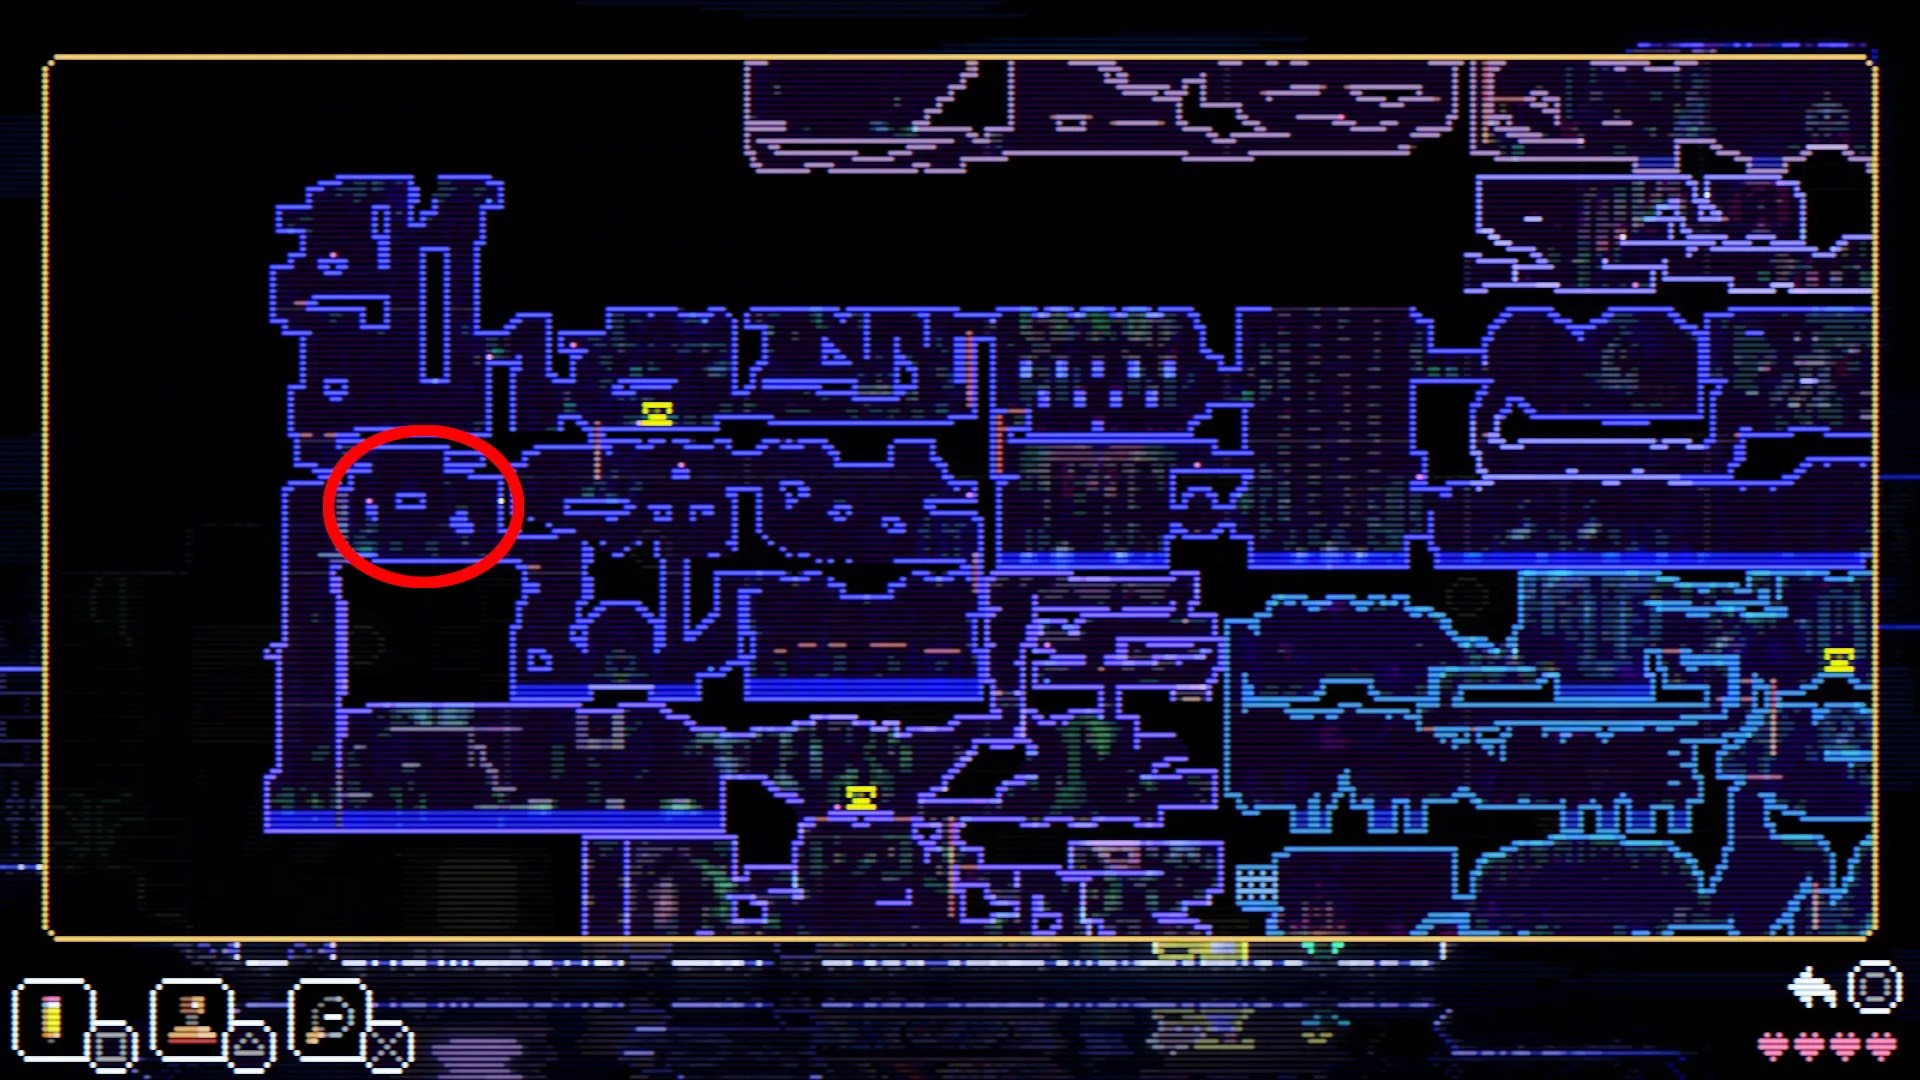
Players who are attempting to collect the B. Flame, should begin by traveling to the room that is one-screen up and one-screen left of the room whereAnimal Well’s Bubble Wandis obtained. For full clarity, the relevant room has a large fish head attached to its right wall, and its precise position has been marked on the map that is above.
Players who have unlocked fast travel can use the fish head in the fast travel room to quickly reach this location.

After reaching the room with the fish head, players should use the Disc to hit the lever in the top-right corner. This action will reveal that there is large chasm in the bottom-left corner of the room, and players should create a bubble with the Bubble Wand and use that object to slowly descend into the hole. As fans travel downward, they should use the Disc to hit a lever on the left, continue riding the bubble, and jump to a platform on the right.
Players should now use bubbles to reach the small platform that is above, and then throw a Disc at the lever to the right. This action will create a path that leads to the room on the right, and players must use bubbles to traverse it. That said, players must block the room’s hummingbird before they can use their bubbles, and here is how that is done:

After crossing the hummingbird room, players should make a save and travel through the opening in the top-right corner. Fans should then continue climbing, using the Disc to break spikes as needed, until they encounter a penguin. Players should then pass that creature and head downward to exit through the bottom of the room.
A chest with the Goodnight Egg can be found along a secret path in this section, and the entrance to that path can be seen in the preceding image.

Players will now find themselves in a room with three buttons and a penguin. The barrier in the bottom-left corner of this room can be removed by placing the Slink on one of the buttons, having the penguin stand on another, and placing the protagonist atop the final one, and fans should pass through the opening that they create to reach a previously-inaccessible section of the save room that was just used.
Here, fans should press the yellow button, to create a shortcut to the telephone, and descend the ladder into a room with an active fountain and three movable platforms. The goal in this room is to adjust the platforms so that the fountain’s water is sent into the empty vessel. The second image in the group that is above depicts a configuration that achieves that goal, and here are details on how to reach the cranks that move the platforms on the left and right.

Right Crank
Left Crank
With the vessel in the fountain room filled, players will have access to a ladder that can be used to descend through the floor. Fans should then use a series of platforms, and bubbles, to travel to the left, taking care not to get eaten by the whale that is in the water.
In the next room, players must use the whale to hit four buttons and remove the barrier in the top-left corner. To do this, fans should situate themselves on the small platform with the block and throw a Disc to the left, allowing it to bounce back and forth between the block and the structure that holds the buttons. Players should then stand on top of the structure and wait for the whale to send the Disc upward with its spout.
After dealing with the whale, players will fall into a room with the Seahorse boss. Thisguide to beating the Seahorse inAnimal Wellwill help fans that may struggle with this boss, and they should pass through the opening on the right, and collect the B. Flame, as soon as it is possible to do so.
Animal Well: How to Get P. Flame (Top-Left)
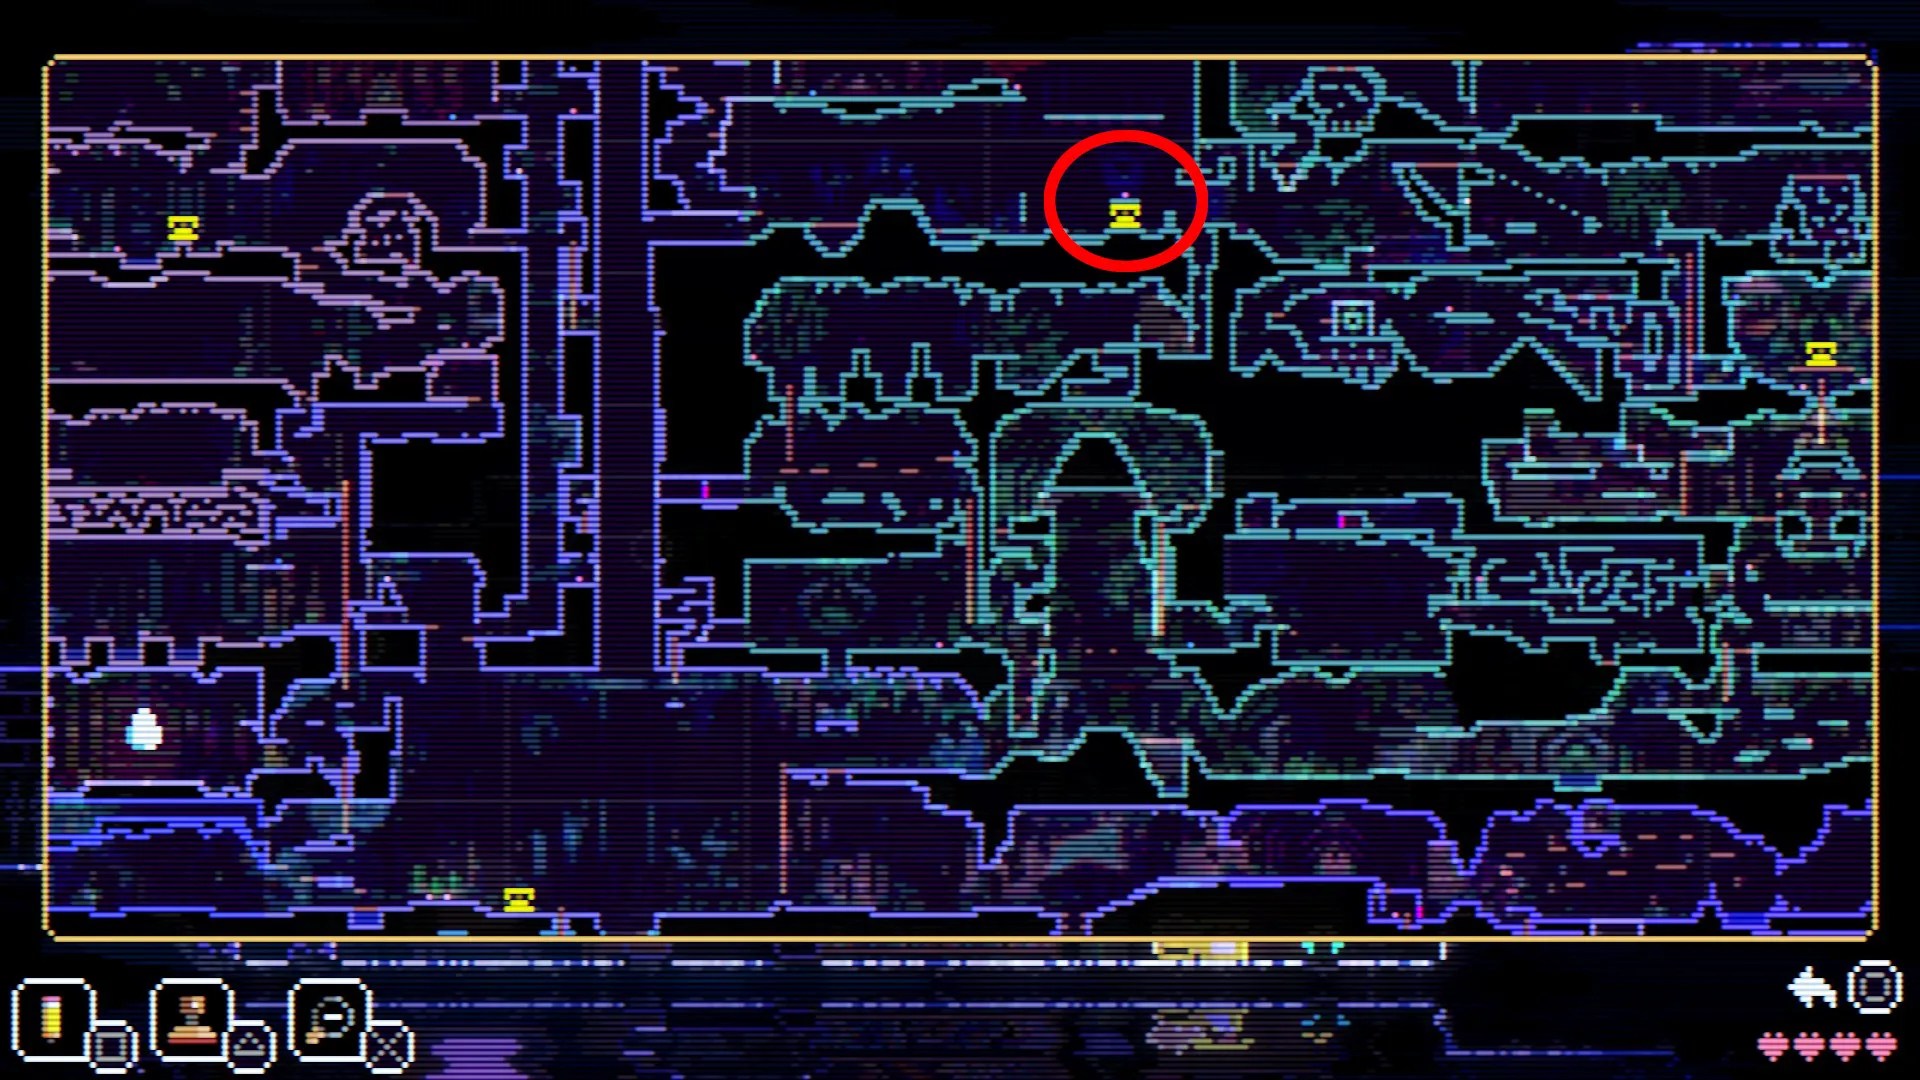
To claim the P. Flame, players must bring the Mock Disc to the M. Disc Shrine, which is at the top of the map, just left of its center. It is very likely that fans previously used the Mock Disc to claimAnimal Well’s Discwithout being chased by the Ghost Cat, and the precise position of the room where that occurred is marked on the map that is above.
With respect to how players should go about taking the Mock Disc to the M. Disc Shrine, the process can be quite challenging, as it must be completed while being chased by the hostile Cat. For those fans that are struggling with this section, this completeguide to reaching the M. Disc Shrine and beating the Ghost Cat inAnimal Wellshould prove to be quite helpful.

Animal Well: How to Get G. Flame (Bottom-Right)
Players who are pursuing the G. Flame should begin by making their way to the room where they found the Yo-Yo. For full clarity, the precise position of this room has been marked on the map that is above, and players will have visited it after falling down the chasm that follows their first encounter with the Ostrich boss.
Players who have unlocked fast travel should see if the frog’s mouth is open in the fast travel room. If it is, fans should enter the mouth and skip the next three paragraphs.

Once a player is back in the Yo-Yo room, they should go one screen to the left and use the Yo-Yo to hit three buttons. That action will make it possible to access a ladder in the top-right corner, and fans should climb it to reach a room with three birds.
To get through this room, players must release the top-most bird by using the Yo-Yo to hit four buttons. Here are details on exactly how that is done, and players should ride the released bird, and exit through the top-right corner, when it is possible for them to do so:

In the next room, players should use the three birds to reach the exit in the bottom-right corner, jumping over the mice heads as needed.
Fans will now be in a room with two buttons and a frog head, and they should drop a Slink on the right-most button and send the Yo-Yo down and to the button on the left. This will cause a barrier on the right to be removed, and players should exit to the right to encounter a hostile Kangaroo. After using Firecrackers to scare that creature, players should create a bubble with the Bubble Wand and use it to exit the room to the right.

Players are now on a path that leads directly to a second encounter with the Ostrich boss and the G. Flame. That path is filled with puzzles, and this comprehensiveguide to reaching and beating the Ostrich boss inAnimal Wellwill help players get through the section and collect the flame.
Animal Well: How to Get V. Flame (Top-Right)
Players who are trying to claim the V. Flame should begin by climbing to the telephone room marked on the map that is above. For full clarity, the path to that room begins with climbing the ladder on the screen to the right of the room with the Seahorse, Ghost Cat, Chameleon, and Ostrich statues, and players will remember the area from the time that they spent pursuing theSlink inAnimal Well.
Players who have unlocked fast travel can use the bear head in the fast travel room to get just two screens to the right of this location.
After reaching the relevant telephone room, players should exit to the left to enter a room with two buttons. The goal in this room is to have both buttons pressed at the same time, and here is how that is done:
Fans ofpuzzle platformerscan now exit through the opening that was created by pressing those buttons and climb until they reach another telephone room. Players should make sure to save in this room before continuing to pursue the V. Flame.
With the save made, players should use the Yo-Yo to quickly hit all four buttons beneath the telephone, and then exit the room through the opening that was created on the right. Fans must then work their way across the next room and exit it through an opening in the bottom-right corner.
In the next room, players can use a Firecracker to awaken the chinchilla, and they should guide it to the left so that it falls from the ledge. Fans should then go to the chinchilla’s initial resting position to access a secret path. That path leads to a new area within the room with the tall structure at its center, and players should use the Yo-Yo to hit the button that is above them.
Players can repeatedly throw the Disc at the left side of the top chinchilla to push it backward and gain access to the chest, which holds an Egg.
Players should now return to the room where they woke up the chinchilla and guide the creature to the square button. That action will cause the square block on the right side of the room to rise, giving fans ofindie puzzle gamesaccess to a path that leads out of the top-right corner of the room.
Players will now find themselves in a room with two otters, and they can use the Yo-Yo to bring those creatures to the right side. While the otters are distracted, fans should quickly drop a Slink so that it hits the buttons on the left-side of the stairs. Players can use the Yo-Yo to keep the creatures occupied while the Slink descends, and they should pass under the blocks as they rise.
In the next room, players must drop a Slink into the area with the movable blocks and guide it to the vertical line button in the bottom-left corner. This requiresMetroidvaniafans to stand on the buttons to their left at the correct times, and players that are having trouble with this puzzle should follow these steps:
Players should now exit the room through the top-right corner and use a Firecracker to wake the sleeping chinchilla. Fans can then use the Yo-Yo to bring the chinchilla to the bottom-right corner of the room and ride it to the exit on the left.
Players will now be in a previously-inaccessible section of the room where they guided the Slink, and pressing the button that is within it will raise a barrier in the bottom-left corner of the room. Fans who exit the room through that corner will now do a bit of backtracking, ultimately arriving at a new section of the room where they awoke the first chinchilla. Here, players should use the Yo-Yo to hit the button on the ceiling and then exit the room via the elevated path on the left.
At the end of this path, fans can use the Yo-Yo to hit a button that is above them, causing a green button in the bottom-left corner of the room to become accessible. Placing a Slink on that button will make it possible to fall through the middle of the tall structure in the center of the room, and players will encounter the Chameleon boss at the bottom.
Players are now advised to use thisguide to beating the Chameleon inAnimal Wellto defeat the boss. Fans should then exit through the left side of the room to reach the area with the V. Flame.
